Pages

Monday, 30 November 2020

A snowflake mandala for Bee Crafty

Hi there! I am here with a really simple card using Bee Crafty Products. This sort of card is really useful for posting abroad as it has no extra layers, and can be done reasonably quickly.
Here is what you will need:
The inkable easy frame 6" circle (the circle 'innie' is 4 inches across)
Journalling Girl- Warm (the snowflake and the stars stamps)
Wordage Small Words winter (the snowflake and a sentiment of your choice)
I used Distress oxide inks in broken china, peacock feathers, salty ocean, blueprint sketch and speckled egg.
A 13.5 cm square card blank
Glitter glue/Diamond Stickles (optional)
Pencil and rubber

 First I used the 'innie' from the circle inkable to draw a light pencil circle onto my base card
 Next I took the snowflake stamp from the Warm journalling girl set and stamped alternately along the pencil line with the broken china, peacock feathers and salty ocean Distress Oxide inks. Each time I lined up the central line of the snowflake along the pencil line, almost touching the end of the previous snowflake. Continue until the two ends meet.
 Next stamp the smaller snowflake from the sentiment set around the outside where each snowflake joins the next one. This was using blueprint sketch Distress Oxide ink.
 Using the Speckled Egg oxide ink, stamp the star stamparound the inside of the circle. I placed them at every other join of the snowflakes.
 Stamp the sentiment of your choice with the Blueprint sketch ink in the centre.
 Making sure all the ink is definitely dry, rub out the pencil like carefully.
 Add something sparkly to the centres of the snowflakes and stars - you could use glitter glue, tiny gems or a sparkly gel pen.
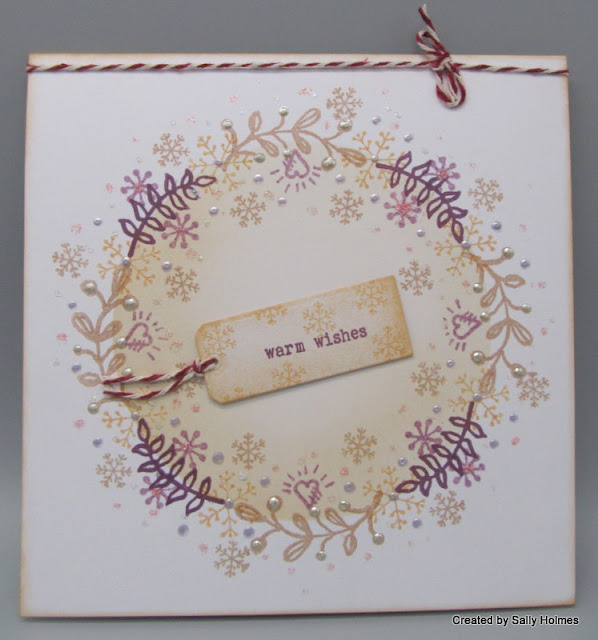
And here is the finished card. I was really pleased that the dimensions of the stamps and the stencil allowed for this to work so well. The super skinny slims also help to align the stamps perfectly.
Thanks for looking! 

Thursday, 26 November 2020

Last Rudolf Days for 2020

Well here we are racing towards the end of November and things aren't very cheerful at the moment. It is definitely time to make some Christmas cards that will bring a smile to a few faces. Time for some brussel sprouts! I decided to make quite a few, but have just popped 4 on this post.  All stamps here are from Hobby Art and the stencils in the background are from Bee Crafty. I am entering these into Scrappy Mo's Rudolf day challenge in the hope I might cheer a few people up. 
I do hope you like them and they make you smile... 

 even the rather risque one at the end 😉

Thanks so much for looking and for all your lovely comments! 

Tuesday, 24 November 2020

A digi from Dora

Hi There!  I am here to share my DT card for Dora over at  Dora-knutselhoekje . Isn't it a beautiful bird image? I printed it onto some white card and coloured it with coloured pencils, hoping to resemble a thrush, although it would be lots better if I had found a picture to model it on rather than relying on memory. The clouds and snowflakes were created using stencils from Inkylicious and Bee Crafty and distress inks with a make-up brush. The sentiment is from Inkylicious too.
Thanks for all your lovely comments. Hoping to spend a little time in blog land this afternoon and leave some comments myself x

Monday, 23 November 2020

Snow Blizzard Samples for Bee Crafty

 Hi There! I am here with the samples I made for the Bee Crafty Hochanda show last Tuesday. First up are the wonderful bauble decorations. I added some acetate on two and added glitter in between to make them into 'shakers', as well as decorating with the snowflake, star and tree frame inkables and pop outs.


The stamps are absolutely gorgeous and I really enjoyed playing with them making all sorts of inky backgrounds...

The bauble easy frames work really well with them too.


 You can probably tell how much I have enjoyed playing with them, and I have plans to play with them quite a lot more over the next few weeks! If you didn't get chance to see the show, it is still available on Hochanda, and both Bev and Jane have done facebook lives with the stamps which are available to watch on the Bee Crafty Facebook Page

You can find the stamps here

 MDF pop-outs are here

The easy frame baubles are here

The snowflake, tree frame and stars inkables are here 

I hope you have as much fun with them as I am having if you decide to take the plunge😁

Thanks for looking!  

Monday, 16 November 2020

A winter tree for Bee Crafty

                       
Hi there! I am going to share with you a little project that I have been working on for a couple of weeks. 
I used: 
Snowflakes from the cool winter journalling girl
Versafine Clair ink (I used grey)
A piece of pale blue polyester cotton (cut from an economy pillowcase)
Some scraps of lilac organza
Various shades of grey and white embroidery thread
Irridesent clear seed beads
Irridesent clear sequins

I began by stamping the tree in versafine clair ink onto the polyester cotton, and placing the pieces of organza across the bottom to make the snowy hills. I placed it in an embroidery hoop and then stitched the organza in place (a back stitch or a running stitch is fine for this)  
                                                 
I then began to stitch the trunk and branches using the 3 shades of grey thread - the palest grey on one side of the tree and the darkest on the other with the mid grey in the middle. I used varying lengths of straight stitch for this, following the outline of the branches first then filling in any spaces.  I used mostly 2 strands of embroidery threads, switching to one strand where the twigs were thinnest.
Next I took it out of the hoop and stamped three snowflakes (the smaller one was really too small so I would recommend 3 the same size) 
I used a mixture of straight stitch and french knots in single strands of white embroidery threads, but you could use other stitches. 
I used a very fine needle to start adding the beads and sequins. Some just beads on their own, and some over a sequin to represent larger flakes. I took it out of the hoop, gave it a cool iron around where the hoop was and added a few extra beads at the top. Finally I popped it in a box frame, securing the fabric under the mount with double sided tape, and adding a few dots of liquid pearls to the mount.  
Hope you like it! I am definitely looking at stamps that lend themselves to embroidery now, and will also look at items in charity shops that I could use for this sort of project. My pillowcase has been made into many masks too - a bargain at £2 for the pair! 
 

Don't forget, Bev and Sam are off to Hochanda tomorrow for a show at 1pm featuring the amazingly gorgeous snowflake stamps and some stunning new mdf too! I do hope you can tune in! 


 Thanks for looking!

Sunday, 15 November 2020

New Christmas Florals stamps from Crafty Individuals


 Hi There! Have you seen the beautiful new Christmas floral stamps from Crafty Individuals yet? They were designed by our very own Isa and are just wonderful! They are so versatile and will be used over and over again! 

Here are a few of the cards I have made with them so far...


The stamps are just wonderful. You can find them here and here is the plate in it's full glory!

Thanks for looking!


Monday, 9 November 2020

A Happy journal spread for Bee Crafty

 Here is a journal page spread that I created in my Dylusions journal using Bee Crafty stamps. I took a few photos along the way, so hopefully you will see how it came together.
I used
Chalk effect acrylic paint in marine blue, pale green and dark green
pale green gel pen 

First I painted across both pages with chalk effect paint in a marine blue, pale green and a darker green. I put a layer of scrap paper under the pages each side to protect those underneath from my messiness!
I set this aside to dry and stamped and coloured a selection of beautanical leaves and doodle art mushrooms. 
Once coloured with ecoline pens, I cut them out
Now here is the bit I forgot to take a photo for. I stencilled some leaves at the top of the dry pages using the leafy branch d'inkable and black soot distress oxide ink. I also added a few smudges of black distress crayon as ground, before stamping some foliage from the doodle art mushroom set in archival black ink along the lower edge.
After spending a while moving the images around, I found where I wanted to put them and I stuck them down. Now I should have used a mat medium, but forgot and used PVA, which left a couple of little shiny marks.... To cover them up I used the sentiment and then added a few highlights in gel pen - a pale green for the foliage and white elsewhere on the page.  
Thanks for looking!  

Monday, 2 November 2020

Bee Crafty Winter Journaling girls for Hochanda

 Hello there! Did you manage to Catch the Bee Crafty show on Hochanda last Tuesday? I had great fun making the samples for the Winter journaling girls stamps! Here they are...


First up was an MDF long journal with 'Cosy' on one side and 'Warm' on the other.
Next I made a card using 'Cool' and the snowflake mask background.
This is Warm over a gelli print background with a sentiment from the La Luna range and a fab pop out star
Trying to recreate the Christmas jumper patterns here with some of the smaller stamps, simply embossed in silver on an Aubergine coloured card.
This one is my favourite I think. I used a mixture of Tea Dye Distress ink, Chianti versafine clair and memento in sweet plum and desert sand. The dots are spun sugar Distress stickles and liquid pearls.
Here is 'Warm' in silver embossing powder.
Here is another single layer card with a masked off strip for the sentiment.
this was a fairly boring blue gelli print which I used as a backdrop for the snowflakes stencilled in white gesso. The pop out snowfake is painted in very shimmery paint.
Finally we have Cosy and Cool on MDF with the tree stencil and the popouts

As you can probably tell I had lots of fun with these! If you want to invest in the whole bundle that also includes the winter journaling words, you can find it here

Don't forget the fab new inkables too! They are all here

Thanks for looking!