Pages

Saturday, 27 February 2021

Last minute Rudolf day and a digi from Dora

 Hi there! I am flying in last minute with a single offering for Rudolf Day. I'm afraid that the end of February has crept up on me as always. 

Here is my Christmas card made with Inkylicious stamps, a circle stencil and lots of nuvo drops, liquid pearls and stickles. 

Do pop over to Mo's blog and take a look at the Christmas cards on display this month. 

Here is my latest of Dora's wonderful digis - a gorgeous bunch of Daffodils, coloured with pencils, simply die cut and placed over a stencilled background using distress oxide inks and a Bee Crafty mandala inkable. 

It has felt very spring-like here over the past few days we had a walk on Friday and saw lots of catkins and some pussy willow as well as crocuses and a few early daffodils. I hope you have seen some sunshine too.

Thanks for looking! 

                   Sally x

Wednesday, 24 February 2021

More samples from Crafty Individuals Animals galore show


Hi there! Thought I would share with you my other samples from the most recent Crafty Individuals Hochanda show now that the stamps have been added to the website.  First up is the wonderful giraffe (CI-564), stamped and layerd onto a background created with dylusions sprays, crazing collage medium and Bee Crafty stencils. The giraffes were embossed - one in gold and one in copper and coloured with arteza brush pens onto watercolour card. The sentiment was stamped using the Bee Crafty Typewriter Alpha set.
For the Flamingo card I used the trees from CI-561 and sentiment from CI-565 along with Mismesh, Fragmentation and  CI-116 along with the Flamingo (CI-563)
I think the giraffe is possibly my favourite. I stamped him in black versafine clair, masked him and then stencilled with distress inks and a that's crafty stencil. I stamped the French Script in grey ink down the side and added the Happy Birthday from CI-464 over the top. This was a quick card.
Next is the stag, watercoloured and placed over a backgorund of distress oxide inks in Antique linen and Speckled egg. The background stamp is CI-430 and the sentiment is on CI-438
Finally here is my altered tuna tin! I cut a circle of one of Malcolm's photo background papers to cover the bottom and added vintage style journaling paper to the mdf base and the outside of the tin. I stamped the toucan and cut it out, extending the branch until it was longer than the width of the tin. I attached the ends of the branch with strong glue to the inside of the tin then added a few leaves from a discontinued set

Do check out all the new product on the website that you can find here

Thanks for looking!

                            Sally x

Monday, 22 February 2021

Something a bit different!


I've been having a bit of a play with my newest distress oxide colours and thought I would share the results. It is a bit of a cross between a journal page and a card, but I think it would work as either. 

Here is how I made it. I started off with a 14cm square piece of mixed media card and painted it with Dina Wakely Clear gesso

This allows the ink to move more when you apply it and not soak in immediately. After that I swiped the Crackling Campfire Distress Oxide pad onto a piece of acetate, misted with water and then splodged it in a couple of places down one edge. 

It wasn't runny enough so I sprayed it again and let it run across the page. I then dried it with a heat gun. 

Next I did the same thing in the gaps with the Rustic Wilderness Distress Oxide ink and dried it. Then I used both inks to make some splatters using a fan brush.

once this was dry I used the same inks to stamp the zig zag stamp from the Texture Borders set going in the same direction as the dribbles.

I then stamped the lines from the Texture Borders set down the inkiest edge using black Versafine Clair.

Next to that I stamped the dots border using the same ink.

I die cut a circle from black card and stamped 2 circles from the Texture Circles set in black ink about two thirds of the way down the side. 

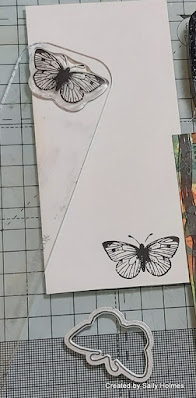
I stamped the butterfly from the reguar butterflies and birs set and cut it out with the matching dies.

I coloured it with ecoline pens.


After matting and layering the background on to a 15cm square card I added the circle of black card and the butterfly using 3d glue.

And here is the finished card again. 

I hope you like it! Don't forget to tune in to Hochanda tomorrow for the Bee Crafty show at 1pm for oodles of butterfly and bird stamps, dies, inkables and mdf! Loads of goodies! 

Thanks for looking! 

                         Sally x

Friday, 19 February 2021

Animals Galore!

 Hi There! I thought it was high time I shared a few more of my DT makes for Crafty Individuals that were on Hochanda last week on the Animals galore programme. I don't know if you managed to catch them or not, but they were brilliant shows with multiple sell outs! The new stamps by Ellie Mulligan will be on the website very soon, so look out for a newsletter from Jean and Malcolm or an announement on their facebook page.  

For my first card I stamped the zebra in black, masked it and stencilled the background with a Bee Crafty stencil and citrus twist distress ink. I moved the stencil then went over again more lightly with sqeezed lemonade, adding some sequins.
My second card was stamped in versafine clair ink onto a background created with spectrum noir glitter pens as a colour wash.
Here is another zebra card. This time I stamped the silhouette animals in brown ink onto a craft card and also stamped the zebra at the corner but in black ink. I then stamped and embossed the zebra onto white card using black ink and cut it out (this means no fussy cutting of the mane is required as it is on the card already and can be cut from the one being placed over the top. 
Next up are Ellie and Nellie, those lovely elephants. I found some backgrounds I made with adirondack colour sprays from quite a long time ago and this one reminded me of African sunsets. I stamped the elephants in Black ink and added a few highlights using a white gel pen.
Finally, here is a notebook decorated with some mulberry paper and a piece of calico stamped with the elephants and coloured with inktense pencils. I will be back next week share my remaining samples. In the meantime, here is a link to the Crafty Individuals website so you can check out what has been added to the website recently in the 'New' section 

https://www.craftyindividuals.co.uk/

Thanks for looking!

                             Sally x

Monday, 15 February 2021

Butterfly Birthday Greetings


Hi There! The Doodle Art Insects and flowers seem to be my 'go-to' stamps at the moment when I need a card and Mr Mojo is having a break. As soon as I start colouring them he seems to show up again! Last weekend I made another colourful birthday card using the Doodle Art butterflies. Here is how I made it.

First I smooshed some distress oxide ink in Broken china onto some acetate, misted with a little water and touched it onto a 13cm square of plain card.

Once this was dry I place the Big Ones Botanical Garden inkable over it and sprayed with distress oxde spray in wilted violet.

Whilst it dried I stamped 2 butterflies using the regular doodle art butterfly set  onto watercolour card and coloured (you don't have to be particularly careful with colouring as they are going to be cut out) with ecoline pens in deep yellow and magenta.
I added a few Gelly Roll gel pen highlights and then cut them out, removing the antenae.
I stamped the butterflies onto the background where I wanted to place them
and used 3d glue gel to stick the cut out butterflies over the stamped images. This way they can still have antennae! The spatters and dots around the stamp are also added.
I matted and layerd the background onto a 15cm square card, adding the Happy Birthday sentiment from the everyday sentiments 2 set.
Here is another look at the finished card. Those bright colours really cheered me up! It is well worth experimenting with different colours together. The yellow and Magenta weren't a combination I would have guessed would work so well. Hope you like it.

Thanks for looking and Happy stamping!

                             Sally x

Tuesday, 9 February 2021

Putting my stencils to good use!


 I've not entered many challenges for quite a while, so I thought it was high time I put more of my stencils to good use and entered CAS Mix Up where the challenge is to heat emboss through a stencil. I have used mostly very very old stash for this one. The Stencil was bought at Stamp Magic Doncaster 9 or 10 years ago, I think from Stamposaurus. The stamp was bought from Stamporium about 20 years ago, and the green pearl embossing powder was also from there. I used Distress Oxide ink in Crackling Campfire and Rustic Wilderness (new to my stash) to ink through the stencil and to ink up the stamp. Here is a closer look at the embossing powder sheen. I really wasn't sure if it would have gone off, it is so old, but it worked perfectly.

Do check out the talented DT over at CAS Mix Up. Their work is so inspiring! 

Thanks for looking! 

                         Sally x

Monday, 8 February 2021

Flowery Birthday Greetings


 Hi there! It is Monday, so I am here with another project featuring some Bee Crafty products. With grey cold weather and potential snow I decided to go for hot colours on a 15cm square card.


I began by making a background using Distress oxide inks in Spiced Marmalade, Abandoned Coral and Worn Lipstick. I swiped the ink pad on to a piece of acetate, misted with water and applied to the card. It is smooshing but with more accuracy as you can see where you are putting the colours. I first saw Dot Leathbridge use this technique on a facebook live and thought how clever it was. 

I dried with a heat tool before using Inkable mandala 1 to sponge more Abandoned coral distress oxide through, then splattered with water. I set this aside to dry.


Next I stamped 3 flowers and the leaves from the regular Doodle Art dragonfly set on to watercolour card using versafine clair ink.


I coloured them with Ecoline brush pens and cut them out. I then matted and layered the background onto a card. I also gave them a coat of collage medium (I used one with a gloss finish)

I arranged and attached the flowers and leaves to the background using 3d glue and added some glossy accents to the centre of the flowers.


I stamped the sentiment from Everyday Sentiments 2 onto the background with versafine clair ink, being careful not to smudge the glossy accents.

 Here is another look at the finished card. Hope you like it!

Hope you are okay and managing to fill your lockdown time in a good way.

Thanks for looking and for all your lovely comments. They really make my day! 

                  Sally x


Saturday, 6 February 2021

Crafty Individuals on Hochanda next week!

 The lovely Jean Hardy will be taking some brand new Ellie Mulligan stamps and loads of gorgeous samples on to Hochanda on Friday (12th February) at 10am and 2pm. Make sure you don't miss the Crafty Individuals shows!

Here are a couple of the samples I made for Jean using the Ellie Mulligan lion king stamp CI-524. 

The first was stamped over a background of smooshed distress oxides in crackling campfire, speckled egg and peacock feathers. I fussy cut it and then brayered a background in 3 shades of aqua/blue chalk paint. I used a That's crafty stencil and gold paint on the background before adhering the lion using 3d foam pads to the front.
For my second card I smooshed the background with the same colours then stamped it with a range of Flo Langley's background stamps. I stamped the lion onto kraft card adding a little coloured pencil to emphasize his features and again used 3d foam. The sentiment was stamped and embossed onto jade parchment paper and folded over the corner. 

Thanks for looking!

                             Sally x

Monday, 1 February 2021

A flowery tag for Bee Crafty


After last week's sunflower, I thought I would share my second favourite Bee Crafty flower with you today on a tag. Here is how I made it

I cut the largest tag (with a hole) from some corrugated card (mine came from some packaging around some biscuits and was originally white, but it would be worth experimenting with a variety of packaging)

I sprayed it with distress oxide sprays in Wilted Violet, Rustic Wilderness and Salty Ocean

Once it was dry I stuck it onto a black layer, again cut with the tag dies

I set this to one side and took the flower from the XL Doodle Art Ladybird set and stamped it three times on to watercolour paper in black waterproof ink (versafine, versafine clair or Archival will be fine)

I cut out the whole flower, leaving a border, the pointed petals and the very centre of the flower.

I used ecoline pens to colour the flower.

Once the flower parts were dry I shaped them on a piece of foam using a ball tool.

I used 3d glue to layer the flower to the front of the tag.

I stamped a sentiment from the Small words set onto a scrap of the watercolour card and cut it out

I added it to the tag along with some white gel pen highlights and some dots of liquid pearls to finish it off. I also punched a hole through the black layer and added a scrap of ribbon. Here is the finished tag.

And here is a close up to show the dimension

The effects of the sprays on corrugated card is definitely something I will try more of, and a bit of recycling is a bonus.

 Thanks for looking and for all your lovely comments!

                             Sally x