Monday, 2 August 2021

Journaling girl Makeover


Hi There! Last time Bev and Sam were on the Craft Store, Adam was talking about creating fabric dresses for the journaling girls, so I decided to have a go. 

I began by stamping Sam on to a piece of calico with Archival ink.

Next I used a combination of Inktense blocks and Dina Wakely scribble sticks to colour her skin and hair.

I found some lovely variegated embroidery thread in yellow and brown that was perfect for hair and used long stitch. I also added a row of pale pink seed beads at the base of her bun. 
Next I took a square of  fabric (This was a dyed silk handkerchief) and placed it over the top half of the stamped image. I lined it up with the sleeves then stitched across the shoulders and neck with a small running stitch. 

Once this was secured in place I pulled the top edge of the fabric down and added some more small stitches around the edge of the bodice to secure the fabric, tuck in the raw edges and add some shape.


I took a rectangle of fabric approximately16x12cm . I attatched the centre point to the waistline using a small running stitch. 
I then pulled the top of the fabric down and added a row of the seed beads to the waistline. I arranged the skirt and added a few more seed beads to keep it in place. I also added a sequin and a seed bead to the bodice.
I used one of the small stamps from the Sam set to add a background using archival inks.
Next I added some interfacing behind the project to make it more sturdy - It doesn't need to be the iron-on variety, just a piece of fabric, felt, thin wadding or batting. This was secured in place by adding a border of lace around the edges. I used my sewing machine for this but it could have easily been hand stitched. I also added a strip of ribbon down each side, which I secured using sequins and seed beads.
I sprayed an mdf butterfly hanger (This is a sneaky peek!) with Dina Wakely gloss sprays in Fuchsia and White and added a couple of loops of ribbon.
I gave her some earrings to match...
then finally I attached the panel to the hanger with a couple of stitches at each side. 
Here are links to the products used:

I also used scraps of ribbon and lace, Embroidery thread, seed beads, Sequins, a softly draping fabric for the dress (you could pick something up in a charity shop to cut up), Calico and interfacing/wadding/ batting.
The important thing with a little project like this is it doesn't need to be super neat. The edges can be left raw and the stitches don't need to be tiny neat ones. Some people call it slow stitching, and it is as much about the mindfulness of using a needle and thread as the finished product. A bit of ironing of the calico at the beginning and end will help it to look good. it also doesn't need to be expensive. You could make something like this from clothing that is past it's best or charity shop bargains.
I hope you like my project today. Thank you so much for all of the congratulations messages on grading to 1st Dan. I am eagerly awaiting delivery of my belt embroidered with my name in Japanese in gold!
Thanks for looking! 

Wednesday, 28 July 2021

Guest Brand Ambassador for Uniko

Hi there! I completely forgot that I had another Mixed media Monday slot this week for Uniko. I did a journal spread and a card. 
If you like the look of the sneaky Peeks here, then head over to the Uniko blog to see them in full glory by clicking on this link:
 http://unikostudio.blogspot.com/2021/07/mixed-media-monday-guest-brand.html

There are also new stamps and stencils in the Uniko shop 

Thanks for looking! 

Monday, 26 July 2021

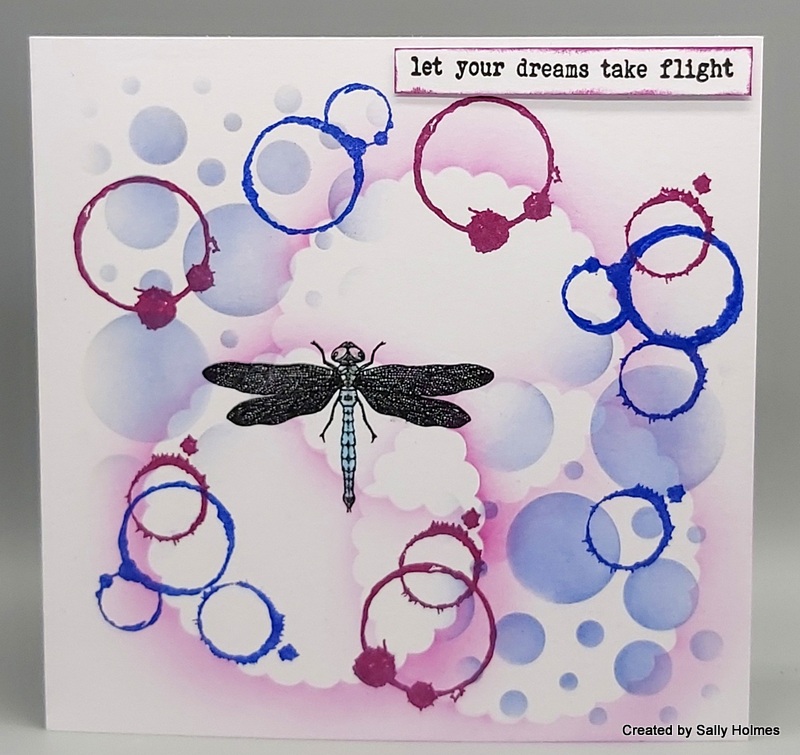
Circles galore and some Karate News!


Hi There! I am here with a quick and simple card for you today. It has been rather hot and sticky here in the UK and so a little simple crafting was just the ticket.

I began with a 6x6" white card blank. I used the innie from the small scalloped circle easy frame, Distress oxide ink in seedless preserves and a blending brush to go around it three times. It doesn't need to be central.

Next I took the circles D'inkable and inked through it with a blending brush and blueprint sketch Distress Oxide ink.
In the centre of the card I stamped the Dragonfly using versafine clair ink.

I then stamped the coffee stains in the same shades of Distress Oxide ink randomly around the card. 
I added a sentiment from the small words set, stamped on to a scrap of white card and edged with the seedless preserves ink. I used gel medium to attach it to the card.

Finally I added a little pastel blue ecoline to the body of the dragonfly and then made it sparkly with a gelly roll clear stardust pen.
Here are links to the products I used:
Ecoline pens 
Here is the finished card once again


Now then, whilst I am here I thought you might like to see a few photos from my weekend. It was the first Blackbelt Grading since December 2019 and I was there to go for my 1st Dan.


Thanks for looking! 

Monday, 19 July 2021

See the stars plaque


Hi There! I hope you are okay and keeping well. I've got a little mdf plaque mixed media project for you today. Here is how I made it.

I stuck some mdf pop outs (although these aren't in the online store at the moment, you can get them at The Craft Store here) onto an mdf tag with two holes added to the bottom and painted them with black gesso.
Next I used a dry brush to lightly paint white gesso across the pop outs.
When this was dry I sprinkled with Pretty Gets Gritty Explosion powders in Mermaid, Neptune and Unicorn.
These were activated with water from a mister bottle.
Once the explosion powders were dry I used the unicorn white ink to stamp the border, circles and swirls onto the mdf.
I selected 6 pop out stars and sprayed them with Dina Wakely gloss sprays and left them to dry
I stamped the sentiment using the white ink on to heat resistant acetate and heat embossed it with fine detail white embossing powder.
I stuck the sentiment to the bottom of the mdf using gel medium.
I added some black ricrac through the holes and stuck the stars to it using gel medium. I also gave it a light spray with a spray varnish to seal it.
And here it is hanging on the wall. 

Here are links to the products I used:

I hope you like it. Thanks for looking! 

Monday, 12 July 2021

A shimmery tree for Bee Crafty


Hi there! I had so much fun making this tree card I thought I'd do a step by step tutorial for it today.

I used 

A blank 15x15cm ivory card

A 14.5 square piece of watercolour card

Speckled Egg Distress Oxide spray

Peeled Paint Distress oxide ink

Inkables Skylines Horizon 1

Beau-tanicals -Large branch and tree set

Versafine Clair Pinecone ink

Easy frame circle inkable 

mister

Pretty Gets Gritty Explosion Powders in Mars, Mermaid and Atlas

Everyday Sentiments 1 

Doodle Art Dragonfly XL stamps 

liquid glaze or glitter glue

I began by using the skyline inkable and peeled paint ink to make the foreground.


 Next I lightly sprayed the top part of the card with the speckled egg spray. In retrospect I should probably have done the spray first and the blending second as I needed to wipe away a few spots of ink from the green area.

Next I stamped the tree in the centre with the waterproof ink. Versafine, Versafine Clair and Archival are all suitable for this.
I place the circle inkable over the branches of the tree and used the mister to spray lightly with water.
I then sprinkled with the explosion powders

When this was dry I added a sentiment bottom right and edged the panel with more brown ink.

I attached it to the base card, but it didn't seem quite finished, so I looked through my doodle art stamps and found the hearts on the Doodle Art dragonfly set. I stamped them top right and used a translucent red glaze on them.
Here is the card....
and a final look at the shimmer from those explosion powders...

Thanks for looking! 

Monday, 5 July 2021

Guest Brand Ambassador for Uniko

 A few weeks ago I was asked to be a guest Brand Ambassador for Uniko Stamps by the lovely Bev. My challenge was to do a couple of mixed media projects for their Mixed Media Monday slot. Here is a sneaky peek and if you pop over to the Uniko Studio blog you will be able to see what I did.