Showing posts with label embroidery. Show all posts

Monday, 23 August 2021

Bee Monarchy wall hanging


Hi there! Thought you might like to see a step by step for my embroidered Bee fabric wall hanging. 

I began by stamping the Bee in versafine clair onto a piece of calico. A stamp press is a good idea as the magnets help to keep the fabric still. 

I removed it from the stamp press, put it into a small embroidery hoop and began to embroider it. I used 2 strands of embroidery thread for all of the bee's body and legs, completing the white and yellow stripes first before beginning the black. With the white tail I added a few strands of grey for shading. I just used varying lengths of satin stitch. It doesn't need to be particularly neat as it gives the impression of the bee's fluffy coat.
I then embroidered the legs in the same way.
For the eyes I used a sparkly black thread and stitched french knots. This thread was quite a bit thicker -the eqivalent to about 4 strands of regular 6 strand embroidery thread.
For the wings I found some sheer organza style ribbon (if you can find one that doesn't fray that is great!). I cut a piece that was big enough to cover the wings and dipped it in some watered down blue acrylic paint. 

When it was dry (air dry as some of these ribbons melt very easily), I traced the shape of the wing through it using a pencil, cut it to size, then stitched it in place using a single strand of fine silver thread.
Once the embroidery was finished I took it out of the embroidery hoop, cut a circle of white felt and blanket stitched in yellow around the edge. 

I sprayed a 6x6" square of calico with a light spray of lemon gloss spray. When this was dry I placed the honeycomb inkable over it then sprayed lightly with cheddar gloss spray. I stitched this to a piece of hessian using back stitch before attaching the bee panel to the middle with 5 or 6 small stitches around the edge.
I added a paper flower using a brad bottom left and frayed the edges a little.

I used the plain hanger and painted it with white gesso. I added a piece of the mdf pop-out honeycomb that I had trimmed to fit and painted with gold paint. In each section of the honeycomb I added some glossy accents swirled with a shake of Pretty Gets Gritty Apollo explosion powders.
I used some white fabric tape to attach the hanger to the panel.
And here it is finished. 
Here are links to the products I used
Calico
Embroidery threads
Hessian
organza style ribbon or fabric in white or pale blue
MDF hanger  - will hopefully be available soon
paper flower and brad

I am really enjoying combining my stamping and sewing and will definitely be having a go at more in the not too distant future. 
Thanks for looking and Happy Crafting!

Monday, 16 November 2020

A winter tree for Bee Crafty

                       
Hi there! I am going to share with you a little project that I have been working on for a couple of weeks. 
I used: 
Snowflakes from the cool winter journalling girl
Versafine Clair ink (I used grey)
A piece of pale blue polyester cotton (cut from an economy pillowcase)
Some scraps of lilac organza
Various shades of grey and white embroidery thread
Irridesent clear seed beads
Irridesent clear sequins

I began by stamping the tree in versafine clair ink onto the polyester cotton, and placing the pieces of organza across the bottom to make the snowy hills. I placed it in an embroidery hoop and then stitched the organza in place (a back stitch or a running stitch is fine for this)  
                                                 
I then began to stitch the trunk and branches using the 3 shades of grey thread - the palest grey on one side of the tree and the darkest on the other with the mid grey in the middle. I used varying lengths of straight stitch for this, following the outline of the branches first then filling in any spaces.  I used mostly 2 strands of embroidery threads, switching to one strand where the twigs were thinnest.
Next I took it out of the hoop and stamped three snowflakes (the smaller one was really too small so I would recommend 3 the same size) 
I used a mixture of straight stitch and french knots in single strands of white embroidery threads, but you could use other stitches. 
I used a very fine needle to start adding the beads and sequins. Some just beads on their own, and some over a sequin to represent larger flakes. I took it out of the hoop, gave it a cool iron around where the hoop was and added a few extra beads at the top. Finally I popped it in a box frame, securing the fabric under the mount with double sided tape, and adding a few dots of liquid pearls to the mount.  
Hope you like it! I am definitely looking at stamps that lend themselves to embroidery now, and will also look at items in charity shops that I could use for this sort of project. My pillowcase has been made into many masks too - a bargain at £2 for the pair! 
 

Don't forget, Bev and Sam are off to Hochanda tomorrow for a show at 1pm featuring the amazingly gorgeous snowflake stamps and some stunning new mdf too! I do hope you can tune in! 


 Thanks for looking!

Monday, 14 September 2020

Stamping on fabric for Bee Crafty


Good morning! I am here with a little Bee Crafty DT project and to bust a few myths, lol! Let's start with those. Firstly you don't need special ink to stamp on fabric unless you are going to wash it. If it is going on a card it isn't going to be washed, so most inks will work well. I have used versafine, versafine clair, memento luxe, stazon, brilliance and versamagic. All worked fine, but I was particularly impressed with the versafine clair, which is not waterbased and can be coloured and dampened after stamping without it changing.

Secondly, you can colour your fabric with most mediums. All those sprays like dylusions and distress oxides can be sprayed on fabric. It would wash out, but for a card they are wonderful. You can also colour with inktense pencils and blocks which I am told can be heat set, becoming permenant after ironing. You will need to iron your fabric a couple of times during the process. You can also use a range of fabric. The best thing to do is experiment and see!

Let's get on shall we?

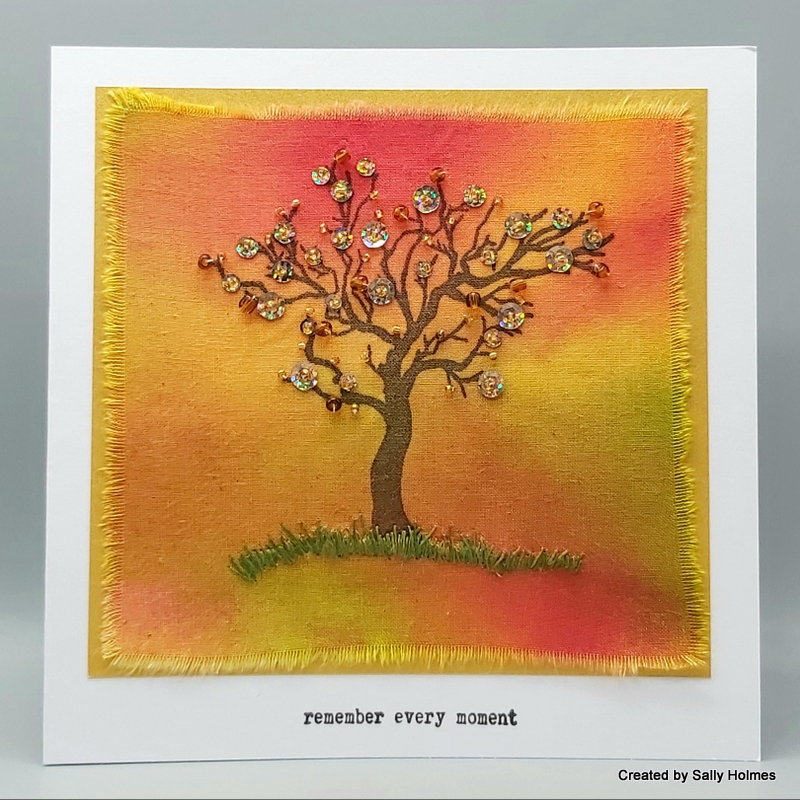
I used dylusions spray inks, Beautanicals large branch and tree stamps, Wordage small words, Brown Versafine clair ink, sequins, seed beads and green embroidery threads


First I started with a piece of calico and sprayed with dylusions and water. Once it was almost dry I ironed it. I've also used poly cotton pillow cases and curtain lining which also worked well. I tend to rip the fabric to give a frayed edge along the weave so it is straight.

I placed the flat coloured fabric in my stamp platform and stamped the tree using versafine Clair. If you want to use an embroidery hoop make sure your fabric is big enough and you stamp centrally. You can always make it smaller afterwards.

Next you can use up some of the little stuff from your stash! I sewed on small seed beads in the middle of sequins. Check your needle is narrow enough to pass through your beads before you thread it, lol.

Next I added some smaller and larger seed beads on their own.


To ground my tree I added 'grass' which is just straight stitch in 2 different shades of green. It doesn't have to be neat and it can be all different lengths, just like grass. Just keep going until the gaps are filled. I used single strands of embroidery thread for my grass. You could add some embroidery to the tree too. Single Chain stitch makes good leaves and french knots also look good. There are plenty of you tube videos for these. Once you have finished, iron your fabric again taking care around the embellishments.


Mat and layer your fabric to your card. Double sided tape works well, or use a good glue stick to stick fabric to paper. You could even sew it together! 

Finally add a sentiment...

I am really enjoying getting back into needlework at the moment. I've realised there are lots of stamps I can use for this sort of project and it is good to experiment, mixing paper, card and fabric, as well as inks and sprays!

Before I go, just out of curiosity, would you be interested in doing something like this as an online workshop? A little kit to sit and stitch together? It would have to be via facebook I think, or possibly zoom. If so leave me a comment as it is something I am thinking about 😀

Thanks for looking!

Sunday, 8 March 2020

Very different for me!

A few weeks ago I did a workshop at PDA, Langley Mill with Suzanna from Belle and Olive. Suzanna is a textile artist who specialises in all things vintage. We tea-dyed, stamped on fabric, sewed and embroidered. I didn't finish mine in the 2 hours we were there, but brought home my pieces thinking I'd like to add some more colour. After playing around for several days with distress ink and other scraps of paper and fabric, here is my finished piece.
I have to admit that I hadn't done french knots for about 25 years, but it didn't take me long to get back into embroidery. I cross-stitched lots around the time Meg was born, but used to find I'd wake up with painful hands the morning after an evening of cross stitch. I'm happy to say I have been able to do this with no problems.
I decided to try something similar with my own stamps and opted to use one of the small fennel stamps from Woodware.
 I found an off-cut from some shorts I made and used tea to dye it. I then stamped in versafine clair and used a mixture of normal embroidery silk, metallic embroidery thread and seed beads to add to it, which you can see here.
 A bit of mulberry paper, old music, lace and a kraft notebook finished it off.
Thanks for looking!