Saturday 30 January 2021

January Rudolf Days and a Digi from Dora

As January hurtles to a close it is time for the first Rudolf days of the year. My first card is a digi from Dora, coloured with zig clean color markers and paired up with some very old dovecraft papers.

 My next card is a little snowy scene using speckled egg ink and a combination of Bee Crafty and inkylicious stamps.
Here is a third card using inkylicious stamps and plenty of stickles and liquid pearls.

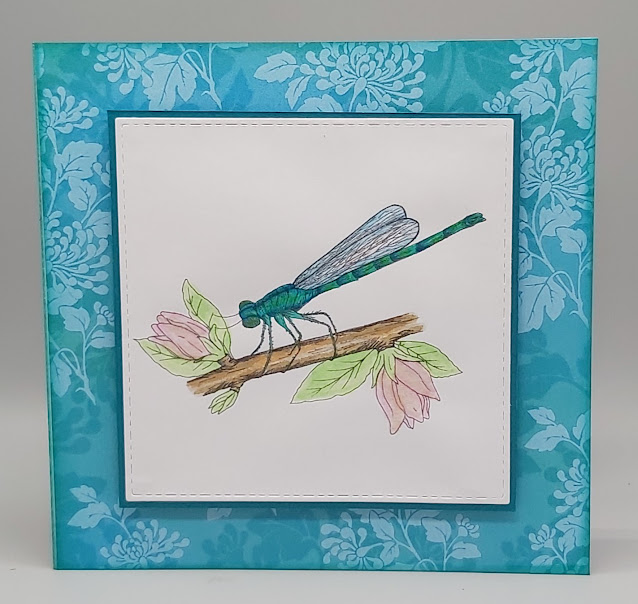
Finally, and not for Rudolf days, here is this month's DT digi from Dora. Isn't it a stunning dragonfly? I coloured it with ecoline pens and fineliners and used some papers from an Artylicious CD (Now Chocolate Baroque)

Thanks for looking and do pop over to Mo's blog and take a look at the inspiration. it is never too early to start on christmas cards!

                             Sally x

Monday 25 January 2021

A sunflower greeting


I recently invested in some distress oxide sprays and so thought I would use them to make a simple background. Now I have to admit it isn't a big background making session, but I will experiment further when I get the chance.

First I sprayed a piece of mixed media card with crackling campfire, rustic wilderness and a bit of water.

I dried it with a heat tool and then splattered it with the same inks, some water and a little brushed corduroy

I left it to dry and stamped the regular sunflower onto watercolour card using versafine clair ink.

I coloured it with ecoline brush pens and cut it out.

Next I matted and layered the inky panel to the front of a 6 x 6" square card blank, before stamping some splatters from the same stamp set in crackling campfire, rustic wilderness and speckled egg distress oxides.

I stamped the sunflower onto the card so I had a clear idea of where I wanted to stick it down. This also allows for any bits that might have been cut off during the fussy cutting.

Finally I stuck down the sunflower and added a few spots of liquid pearls and jewel drops plus a few white pen highlights.

Here is a look at the finished card again. I have left it without a sentiment for now, as it could be a thinking of you, birthday or anniversary card.

I hope you are keeping safe and well.

 Thanks for looking!

                             Sally x

Saturday 23 January 2021

Playing in my Art Journal

 Hi there! Thought I would share with you my first finsihed journal spread in this lovely 14cm square journal that I had for Christmas. My journal has a couple of other pages with backgrounds but nothing else finished yet.

You can probably make out that the colour in the background was brayered (Chalk finish acrylic) - just me cleaning my brayer before using it in another colour. I was rather pleased with the result. I also put a stencil (paint side down) onto the right hand page , and you can just about see the gold just behind the boat. Having seen a fabulous demo from the lovely Isa, I decided to use the 'of the sea' stamp CI-559 designed by Sharron Bates to make a seaside scene.
Before stamping the boats, I used quite a few background stamps to add to the background. CI-017 - french script was stamped in broken china distress oxide, as was the number from CI-397. The circles from CI-540 were stamped in cracked pistachio distress oxide. After that I added the grey crackle CI-116 and the mismesh pattern CI-542 around the edges. 
I stamped the boat (with frame removed) onto my page and then again 3 more times onto some mixed media paper. I painted them with my dewent inktense blocks and cut them out. This one had an extra layer for the lower part of the boat and the one above was made from parts of one cut apart. I also stamped, coloured and cut out a seagull from white card. I stuck these in place and applied a layer of Tim Holtz Distress Collage Meduim of the crazing variety (LOVE this stuff!) and added some Prima Finnabair small art stones below the boats. I added more colour to ground them using the inktense blocks and finally added the verse from CI-397. 

I definitely need to do more of this sort of thing! I really enjoyed it and it came together so well. Almost as refreshing as a stroll on the beach! Before I go, here is a date for your diary - Jean is on Hochanda next on 12th February at 10am and 2pm. I can tell you now that the new stamps are absolutely gorgeous!!! Got a feeling they will sell very well indeed!

Thanks for looking and I hope you are keeping well and finding solace in your crafting! 

                        Sally x

Monday 18 January 2021

Hochanda samples for Bee Crafty

 Did you see Bev on Hochanda on Thursday? She took the Regular Doodle Art houses, brand new dies and some wonderful new big ones inkables too. The whole range of Big Ones inkables were available and also the XL house stamps. Needless to say there were several sell outs, but the website will be restocked soon if you missed out. Here are my samples:


These first two were made with the XL houses. They were coloured with Ecoline brush pens and the new Cotswold Stone big one inkable was used at the bottom.

This card has 3 of the regular stamps, which were die-cut. On the left is 'Rainbow View' in the middle is 'Sky Terrace' and on the right is 'Villa Rosé', again coloured with Ecoline pens.

Next up areTwo samples using 'Bird House'


and some more using Villa Rosé, including a calico drawstring bag coloured with inktense blocks...


Here is another sample using Rainbow View and featuring the fabulous Big ones inkable clouds stencil


 and some more using Sky Terrace.

The background on this yellow and pink one was done with Dylusions sprays and crazing collage medium.

The Cotswold Stone inkable looks great on MDF too!

Thanks for looking!

                      Sally x
Wednesday 13 January 2021

More CAS using stencils

 Following on from my blog post on Monday I have had a little play with two Funky fossil stencils that I had for Christmas, again with the make up brush and distress inks. 

For the first, I used the same inks as the card in the last post.

For the second I used wilted violet and bundled sage. The sentiment is from woodware. Being this CAS is a little out of my comfort zone, lol.

I have had a chilled day today after a day of appointments yesterday. My Dentist was running 45 minutes late (I waited outside on the pavement for her to reach me, which was a little cold to say the least). By contrast, I cannot praise the nurses completing flu jabs at our local surgery enough. They were so brilliantly organised I walked it there and back (8000 steps) and had the jab in less than an hour.  They are marvellous - I just wish I could award them a pay rise! 

I hope you are all keeping well and the current lockdown isn't too hard for you. Sending hugs x

            Sally x


Monday 11 January 2021

Clean and Simple with a stencil

Hi there! Today's blog post is an extremely quick make - A CAS card using a stencil, Distress inks, a sentiment and some liquid pearls.
I used:
Distress inks in festive berries, mustard seed, twisted citrus, mermaid lagoon, blueprint sketch and wilted violet 
A brush to apply the ink (mine was a make-up brush from Home Bargains)
Bee crafty Wordage Small words sentiments
Liquid pearls, glitter glue or tiny gems
Smooth white 15cm square card
   
First I fastened the stencil to the base card. When using a stencil I generally find it easiest to let the card lay completely flat, so I didn't have it folded
I then applied the ink in strips of colour through the stencil in the order I listed them above. This sort of blending brush is very good for producing well defined lines through the stencil and not leaving bristle marks. 
Finally I removed the stencil, Stamped the sentiment in grey and added some dots of liquid pearls along the note. I told you it was quick! 
I have been busily beavering away at samples for the next Bee Crafty show, this Thursday (14th) on Hochanda at 11am. The stamps, dies and inkables on the show are absolutely gorgeous, so I do hope you can tune in and watch - got a feeling there might be a few sell outs!
I am also beavering away at my Crafty Individuals samples for the show in early February, but I should manage a bit of time to look around in blog land by the end of the week. Hope you are all keeping safe and well. Thank you so very much for all your wonderful comments - they mean such a lot to me x
Thanks for looking! 
                    Sally x

Monday 4 January 2021

My progress into Bullet journaling

 Hi There! After creating samples for the December Bee Crafty Hochanda show, I decided that I would like to start a bullet journal. I have always had a week-to-view diary in the past and didn't find it worked particularly well for me. I wanted to start right there and then, so found an A5 pad of mixed media paper and set to work altering the cover with texture paste, inkables, paint, stamps and embossing powder (for a 'how to' check this post where I altered an A6 journal) Here is the result.

The only differences between this one and the step by step is that I brushed over the stencilled part with a wash of turquoise paint and let it dry before applying the gilding wax. I also heat embossed the art journal words border stamp. The stencil is the inkables big one Fern Flourish

Now onto the inside...

I made a pocket using foam tape and card to keep my journalling templates in, then used the big numbers and Star textures to decorate the first page. I masked over 2021 with a post it to add a bit of ink blending.

My next double page is one I already shared on social media. Every year we do the big garden bird watch, but have been talking about doing it each month to get a better idea of when our visitors come and go. We will record it here.

For this page I used the Typewriter Alpha, the templates, the months stamps, the botanical sprigs and that lovely finch from the birds and butterflies set. This was already coloured and cut out using the dies.
My next double page is an overview for the year where I can list appointments and a page for January. Not sure what I will put in the circles yet, but possibly things to do. The stamps used are the big numbers, the months and the botanical sprigs. I used the templates too.  After that I moved on to my month to view spread for January.

For this I used the templates, the month, day date stamps and the doodle art snowflake set.

For all of these I used a mixture of Distress oxide, versafine clair and distress inks. I also used ecoline pens, fine liners and some highlighters. 

I hope you have enjoyed seeing my spreads so far. I have certainly enjoyed doing them and am looking forward to thinking about what else to include along with February.

Thanks for looking!