Showing posts with label snowflakes. Show all posts

Saturday, 29 October 2022

Moonlight and snowflakes


Good Morning! I am here with a step by step tutorial for this card. 

I began by stamping the moon in shaded lilac distress ink onto a 14cm square of white card.
Next I blended distress inks around the moon getting gradually darker.
I added some ground with a skylines inkable in the foreground using black soot distress ink. I also sponged a little around the edge. I gave this background a light spray with water and dried it thoroughly
Next I used an anti static cloth across the card. I then stamped and embossed in white randomly around the page using the snowflake from winter journaling girl Cosy
I stamped Cosy onto the background where I wanted her and also onto a piece of white card.
I coloured her with ecoline pens and cut her out.
After sticking her to the panel over the stamped image with matte medium, I added a few white pen highlights.
I stamped the spots from the same stamp set in spun sugar and shaded lilac around the edge of a 15cm square card
I attached the panel to the card and added a sentiment from winter small words using white ink and embossing powder. I added a few smaller snowflakes from the small words stamp set in just white ink too
 
Here is the finished card again.
I used:
Birds and Moons stamp set ( there is a moon on the conch shell set too)
Distress inks in Shaded Lilac, Spun Sugar, Wilted violet and Black soot
Versamark ink

Thanks for looking! 

Monday, 13 December 2021

Snowflakes tag


Hi There! I got very very inky over the weekend! I thought you might like to see what I was up to.

I Decided to try a bit of resist technique and use some salt with dylusions sprays. 


I began by stamping and heat embossing the doodle art snowflakes with white embossing powder. Here is a close up where you can see the embossing a bit better!

Next I sprayed water all over the tag and sprinkled on a little explosion powder.
I then added more sprays - this time I used dylusions sprays in Calypso Teal and After midnight.
Whilst wet I sprinkled it all  with table salt and then left to dry (this will take quite a while and using a heat gun might over-cook the embossing powder.
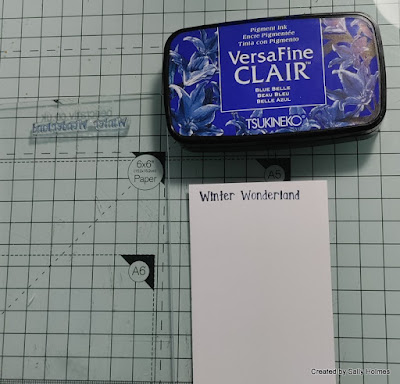
Once dry I stamped smaller snowflakes, dots and stars randomly in the spaces with versafine Clair ink.
I used the same ink to stamp the Winter Wonderland on a scrap of white card, sponging a little extra ink around the edges
Finally mat and layer the tag, adding the sentiment and a ribbon. I also added a little faux stitching with gelly roll pens
Here is a close up of that mottled effect created by the salt.
I used:
Versamark ink
Salt
Ribbon and gelly roll pens

Bev and Sam are off to the Craft Store with the faces stamps and some brand new journal Art stamps tomorrow at 3pm and I will be doing Try it out Tuesday Facebook Live tomorrow at 8pm over on the Bee Crafty Facebook page
Thanks for looking! 
 

Monday, 29 November 2021

Chocolate and cash!


Sometimes we want to give a small gift to someone either as a thank you or for a special occasion. Sometimes this might be a little something to accompany a gift card or some cash. My friend Valerie came up with this lovely idea which I have adapted slightly, and could be adapted for a  gift card too. 

I began with an A4 sheet of  200gsm kraft card, which I measured and scored as follows:

In landscape I scored down at 8cm, 9.5cm, 17.5cm,19cm and 27cm. I also scored along the top and bottom 1.5cms from the edges. 
I cut off the remaining piece of card to the right, along with the 9.5 cm strip along the top and bottom edge from the right hand end. This is what I was left with.
I rounded the corners of the flap and cut from the edge to the first fold top and bottom.
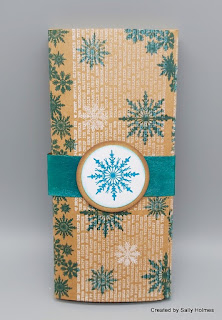
Next I randomly stamped snowflakes in white and chianti ink all over the card.
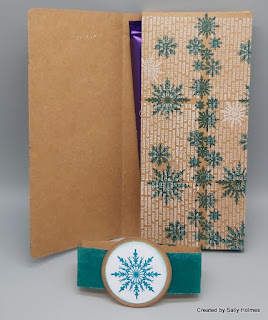
I used pva glue to attach the small flap to the inside-front of the box then stuck the sides together, making a 3d envelope. 
I used another piece of Kraft card, measuring 16x7.5cm to make a separate pocket, using a circle punch to make a semi-circular indent on one edge.

 I stamped this with snowflakes too, rounding the corners and adding a little brown ink along the edges.
Using double sided narrow tape around three edges I attached it to the front of the inner box.
I added the bar of chocolate and the cash into the pocket. If I was giving a gift card I would make a pocket smaller to fit it.

I created a belly band for it's closure using a ribbon, measured to be the correct length (approximately 22cm allowing for overlap) and secured with Gel medium. To cover the join in the middle I added the smaller nutcracker which had been stamped and coloured whilst I was making samples. 
Here is the finished gift.
This was made to fit a 110g bar of Cadbury's Dairy Milk and cash but could easily be adapted to fit other brands and, if needed, a gift card. I am sure it would be useful for gifts at other times of the year too. 
Here is another without the money wallet and just using the snowflake border set. 

For this one I used the strip of card from the end of the A4 sheet, painted with Polished Jade Dylusions shimmer paint for the belly band. The inks were Versafine Clair Warm Breeze and the Hero Arts unicorn white.
For the first I used:
One and a half sheets of A4 200gsm Kraft card
Versafine Clair Chianti
Hero Hues Unicorn white ink
Approximately 22cm of coordinating Ribbon 
Coloured pencils
gel medium

Thanks for looking! 

Monday, 7 December 2020

A Snowflake bauble for Bee Crafty

                  
Hello there! It is Monday and time for another DT share for Bee Crafty. Today I made a Doodle Art Snowflake Bauble. 
I used:
 A clear bauble (available from various craft shops like Hobbycraft, The Range and The Works)
Ribbon

Here is what I did:
 
I stamped the snowflake 3 times in versafine clair ink. You could use any ink that isn't water- based.
Next I coloured the snowflakes with the ecoline pens and cut them out.
I gently folded each of the snowflakes down the centre line and stuck the three together by two tips on each side.
If you want to go sparkly at this stage add glitter, glitter glue or use a sparkly pen. 
Once dry, place the snowflakes inside the bauble and put the two halves together. 
Add a bow and dangle from your Christmas tree! 
I do hope you like it! 
Thanks for looking and I hope your preparations for Christmas are going well!

Monday, 30 November 2020

A snowflake mandala for Bee Crafty

Hi there! I am here with a really simple card using Bee Crafty Products. This sort of card is really useful for posting abroad as it has no extra layers, and can be done reasonably quickly.
Here is what you will need:
The inkable easy frame 6" circle (the circle 'innie' is 4 inches across)
Journalling Girl- Warm (the snowflake and the stars stamps)
Wordage Small Words winter (the snowflake and a sentiment of your choice)
I used Distress oxide inks in broken china, peacock feathers, salty ocean, blueprint sketch and speckled egg.
A 13.5 cm square card blank
Glitter glue/Diamond Stickles (optional)
Pencil and rubber

 First I used the 'innie' from the circle inkable to draw a light pencil circle onto my base card
 Next I took the snowflake stamp from the Warm journalling girl set and stamped alternately along the pencil line with the broken china, peacock feathers and salty ocean Distress Oxide inks. Each time I lined up the central line of the snowflake along the pencil line, almost touching the end of the previous snowflake. Continue until the two ends meet.
 Next stamp the smaller snowflake from the sentiment set around the outside where each snowflake joins the next one. This was using blueprint sketch Distress Oxide ink.
 Using the Speckled Egg oxide ink, stamp the star stamparound the inside of the circle. I placed them at every other join of the snowflakes.
 Stamp the sentiment of your choice with the Blueprint sketch ink in the centre.
 Making sure all the ink is definitely dry, rub out the pencil like carefully.
 Add something sparkly to the centres of the snowflakes and stars - you could use glitter glue, tiny gems or a sparkly gel pen.
And here is the finished card. I was really pleased that the dimensions of the stamps and the stencil allowed for this to work so well. The super skinny slims also help to align the stamps perfectly.
Thanks for looking!