Showing posts with label heat embossing. Show all posts

Wednesday, 7 May 2025

More Pastel Colours


Hi there! Thought I would show you how I made this card today. 

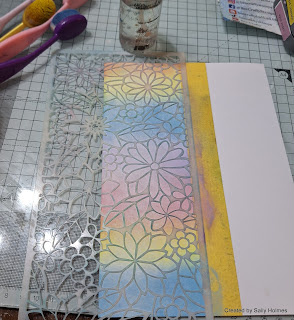
I began by masking off about half of a 5x7" panel of card, and blending pastel distress oxide inks below the tape
Next I sprayed the Big one inkable with water and laid it on top of the inked part of the card. I made sure it had touched the oxide ink all over and then lifted it, blotting away the water on the surface with a clean dry cloth or kitchen roll. 
Next I removed the tape, rubbed over with an anti-static cloth and stamped and heat embossed the sketchy border, using versamark ink and silver embossing powder. 
on a seperate piece of card I stamped the dandedaisy in grey versafine clair ink and coloured it using ecoline markers. I then cut it out.
I trimmed the background panel slightly and attached it to the front of the blank 5x7" card, adding a stamped sentiment in grey versafine clair ink. 
Finally I added the dandedaisy using 3d foam pads.

I used:
Big ones inkable - I used botanical garden
Distress oxide inks - I used squeezed lemonade, tumbled glass, shaded lilac and spun sugar.
Versamark ink/ embossing ink
Versafine or versafine clair ink - I used morning mist
Ecoline pens
5x7 card and white card

This is more inspiration for our current challenge over in the Bee Crafty Facebook group. I hope you can come and join in the fun! 
Don't forget, if you find yourself on the Bee Crafty Website from my blog post, you can get yourself an extra 10% off by using my discount code! Just pop BEESALLY10 in at the checkout x
Thanks for looking! 

Wednesday, 27 November 2024

A bright and cheerful journal page

Hi There! I'm here with a step by step tutorial for this journal page in my 6x6 kraft journal today. 
 
I began by brushing white gesso across the page, leaving a small border of kraft around the edge.

Next I painted blocks of colour onto the page. I used Dylusions paints in Periwinkle, Blue Lagoon and Bubblegum pink. Once this was dry I used the Circles 1 big one inkable, and a set 5 dinkable to add some more white and some black gesso over the colours. (Sorry, I forgot to take a photo for this stage!)
I used an antistatic bag before stamping patches of the Script in Versamark ink and heat embossing in gold. 
On a scrap of black card I heat embossed the sentiment in White. 
I tore some strips of greyscale Catalyst card to add to the page. 
next I cut out the largest leaf from the transparency sheet, before adding these elements to the page with Matte Medium and a few white splatters.
Here is the finished page again...
... and next to it's partner in the journal.
I used:
6x6 kraft journal
White gesso
Dylusions paints in Blue Lagoon, Periwinkle and Bubblegum pink
Big one inkable -Circles one
Versamark ink

It was lovely to sit and play in my journal. Hope you like the results.
Thanks for looking! 

Wednesday, 28 February 2024

Who can resist a rainbow?


Hi There! Thought I would have a little play with one of my favourite stamps of the moment and make a simple card using emboss resist.

I began by blending distress ink across a piece of smooth white card. I used crackling campfire, mustard seed, peacock feathers, blueprint sketch and villainous potion.
once this was totally dry I gave it a wipe with an antistatic bag, then stamped the leaves in versamark ink and heat embossed using clear embossing powder. 
I let this cool for a few seconds then sponged black soot distress oxide ink over the top, wiping over with a dry cloth to reveal the embossed areas. 
On a scrap of black card I stamped the sentiment in versamark ink and embossed using white embossing powder.
Finally I matted and layered the rainbow panel and the sentiment to a 13x18cm card. 

I used:
A 7.5x13cm piece of smooth white card
Distress inks in crackling campfire, mustard seed, peacock feathers, blueprint sketch and villainous potion
paper for matting and layering
13x18cm card blank
Versamark ink

Tomorrow is the last day of the current 'white Space' challenge over in the bee Crafty Stamps group, so you still have time to enter. 
There is also the #beecraftydeck2024 challenge where this week's prompt is 'rainbow'.
Thanks for looking! 

Wednesday, 25 October 2023

New inkables Dragonfly card


Hi there! thought I would show you how I made this card.

I began by masking off the edges of a 6x6 card using stencil tape and blending Peacock Feathers distress oxide ink over it.

Next, I placed the brand new bubble stripes grande inkable over the panel and blended over some Lucky Clover distress oxide ink.
I removed the tape and splattered water over it, blotting away the excess after a short time.
Once it was dry, I stamped one of the freehand borders around the edge of the inked square.
I used versafine clair ink to stamp the sentiment, then set this aside.
On a piece of parchment paper, I stamped the dragonfly in versamark ink and sprinkled detail silver embossing powder over it. I then heated it using a heat tool.
I used the coordinating dies to cut out the dragonfly and attached it to the inky panel on the card using matte medium. 
Here is the finished card again. Leaving the ends of the wings without glue, means they flutter a little as you move the card. 
I used:
6x6 blank card
Inkables Grande - Bubble stripes
Distress oxide ink in Peacock Feathers and Lucky Clover
Versafine Clair ink in Black and Green
Parchment paper
Versamark ink

The new inkables Grande are really gorgeous designs. Perfect for larger journal pages as well as for card making. I can see I will use them a lot!  Thanks for looking! 

Wednesday, 11 October 2023

Making Rainbows


Hi There! After seeing Alison's stunning clean and simple card on 1st October, I had in my mind that I would like to do something similar, but in reverse. I created this card at the weekend with that in mind. 

Here is a step by step to make it. 

I began by blending a rainbow of distress inks partially across the page using blending brushes.
Once this was dry, I wiped an antistatic pad across it and stamped and embossed the pointy leaves in white.
In the spaces in between, I stamped and embossed the rounded leaves in gold embossing powder.
using the small stamp that looks like a dandelion seed, I added more stamping around the edges in the same colour inks that I had used to blend the background. 
On a separate piece of white card I stamped the sentiment in black versafine clair and cut it out.  
I mounted the panel of card onto a 6x6" card blank and added the sentiment using foam pads. 
Here is the finished card again.
I used:
Distress inks in Lumberjack Plaid, Mustard Seed, Twisted Citron and Peacock Feathers
Versamark ink
Embossing powder in white and gold
foam pads 
Versafine Clair black ink
6x6 card blank
white card 5.5" square

Thanks for looking! 

Tuesday, 30 May 2023

Glad you are here journal pages


Hi There! thought I would show you how I made these journal pages for my blog post today. 

I began by spreading dylusions paint with my fingers over the two pages.
I gave it a little dry with a heat tool then sponged through a couple of tag inkables using white gesso
I set this aside then stamped the doodle Art mandalas onto stamping tissue using Monarch versafine clair ink. I cut them out and added them to the page using Matte Medium
Next I mixed a little gold mica powder with some water on a piece of acetate and smooshed and blobbed it onto the page, leaving it to dry. 
I stamped the doodle art dragonfly twice on to stamping tissue and twice onto some mixed media paper. I cut them all out and coloured the mixed media paper ones using pencil crayons.
I stamped the mixed messages sentiment onto stamping tissue and cut it out
Back in the journal I stamped a few of the worker stamps from the dragonfly set using embossing ink, then heat embossed with detail gold powder.
Finally I added the sentiment and dragonflies to the page, positioning the coloured dragonflies over the tissue ones to replace the legs and dots I cut off when I cut them out.
Here is the finished page once more.

I used:
Dylusions paints in Blue lagoon, laidback lilac and peony blush
Tag inkables set 1 and 3
Gold mica powder
Embossing ink

I will be live over on the Bee Crafty Facebook page at 8pm tomorrow, so I hope you will join me.
Thanks for looking!

Saturday, 17 December 2022

Icy tag

Hi There

Thought I would show you how I made this shimmery icy tag. 


I began by cutting the largest tag from mixed media paper and the larger mount from white card.
 
On the tag, I stamped the largest snowflake stamp in versamark ink and embossed in fine detail white embossing powder
I sprayed water onto the tag and sprinkled with explosion powder and left to dry
once it was dry I stuck it onto the white mount and added a winter wordy sticker, some sequins and a ribbon. 
Here is the finished tag once more.

I used :

Versamark ink

Thanks for looking!