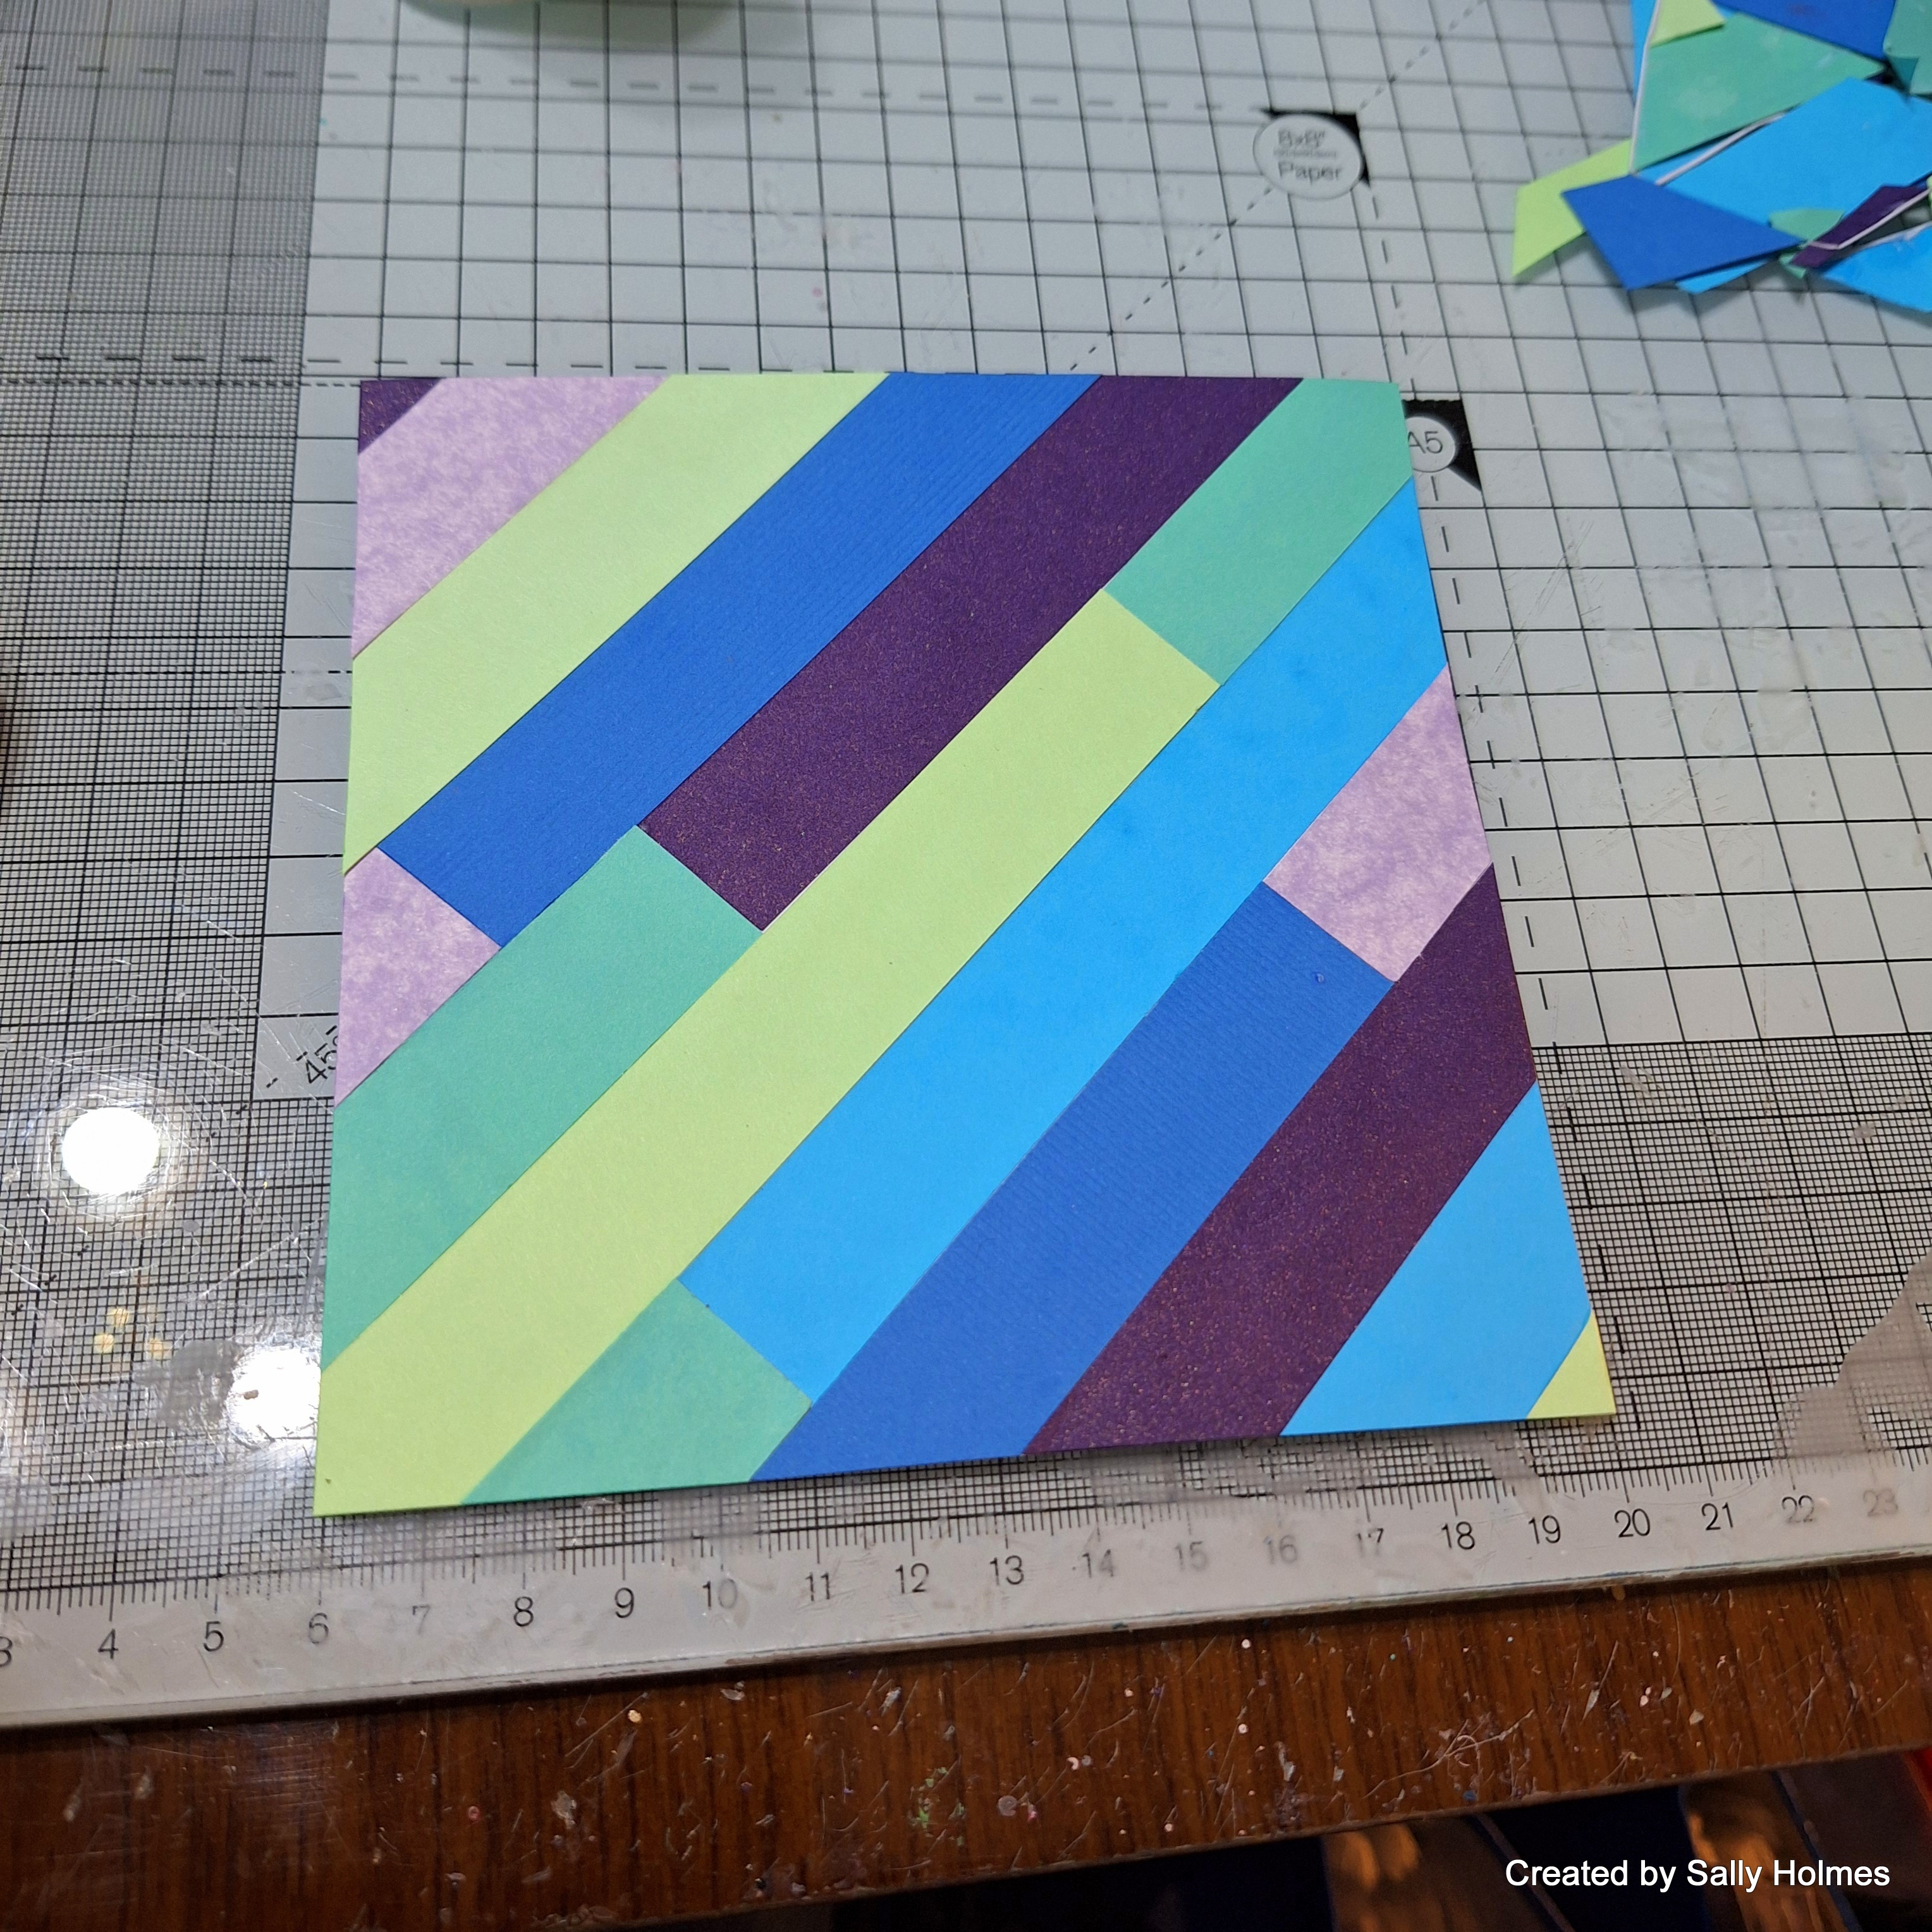
Wednesday, 4 October 2023

Ode to a tree


Hi There! With Autumn approaching fast, I thought I would get out the sycamore leaf easy frame and make an autumnal card this week. Here is how I did it.

I began by blending fossilized Amber and Crushed olive distress oxide inks through the outie of the inkable, onto a 5" square ivory card.
Next I added more leaves, offset form the first ones in Ripe Persimmon, crackling campfire and vintage photo distress oxide
I inked up the crackle stamp with tea dye distress ink and stamped it in patches over the inked background. I also sponged some around the edges of the card
Next, I randomly stamped one of the mandala stamps from set 1 over the background in Vintage photo Distress ink. 
On a scrap of ivory card I stamped the sentiment from Wordage Ticker Tape set 1 in Pinecone Versafine Clair ink and cut it out.
Using sticky pads and some matte medium I added the sentiment and some coordinating sequins to the leafy background. 
Here is the finished card again. 
I used:
5" square ivory card base
Distress oxide inks in Crushed olive, fossilized amber, Ripe Persimmon, Cracking Campfire and Vintage Photo
Distress inks in Vintage photo and Tea Dye
Sticky pads 
Sequins
ivory card snippet

I'm dedicating this one to the wonderful Sycamore Gap tree that is sadly no more. I really hope it regrows or another solution is found. Thanks for looking! 

Wednesday, 27 September 2023

Bee-lieve

Hi There! For my step by step this week I have another layered ink card for you. Here's how I made it.
 
I began by masking a border with stencil tape and blending a mixture of mustard seed and Lumberjack Plaid Distress ink onto a 5x5" card base. 

I then stamped the so Square background stamp in Mustard seed distress oxide over the top before removing the stencil tape. 
I used one of the borders from Freehand borders #1 in lumberjack plaid around the square, masking off the corners with a post it note.
I neatened up any missed sections with a red fineliner pen. 
Next I stamped the largest bee from the BEE mine set onto a scrap of card in black Versafine Clair ink. I also stamped some of the honeycomb outlines in the lumberjack plaid ink over the background.
I smooshed the bee with the same inks and then cut it out.
Finally I added the bee to the background using 3d foam pads and added a sentiment from the same stamp set. I used two colours so this would be perfect for the Bee Crafty Stamps Facebook  group Challenge, which you still have a few days to enter.
I used:
5x5" card blank
Distress inks in Mustard Seed and Lumberjack Plaid 
Distress oxide ink in Mustard Seed
3d foam pads

Thanks for looking! If you have booked to do my workshop on Saturday, I will look forward to seeing you in the group. 

Saturday, 23 September 2023

Online workshop coming up!

On Saturday 30th September I will be teaching an online workshop to make blizzard books that hold 8 ATCs
Here's a link to the Bee Crafty page where you can choose your options. Not available on 30th? No problem! The workshop videos are there for whenever you want to access it, so you can view it as many times as you want after the event. 
I really hope you can join me 😁
Thanks for looking 

Wednesday, 20 September 2023

Free as a Bird


Hi There! As a little inspiration for this month's challenge over in the Bee Crafty Facebook group I have made this simple card. Here is what I did...

I began by masking a border around the 5x5" square card using stamp and stencil tape.
next I blended peacock feathers and wilted violet distress ink across the white space
I used one of the latest dinkables from set 12 to layer over some more peacock feathers ink.
Next I stamped the row of mini rainbows from the Bee mine set along each side using wilted violet.
I stamped and cut out the largest rainbow bird and used the same inks to watercolour him
I shaped him a little and added him to the background using sticky pads
I also added some twinkly spots to him using a gelly roll stardust pen
Finally I stamped the sentiment in white ink onto a scrap of black card and added it to the card.
I used:
A 5x5" square card blank
Distress inks in Peacock Feathers and Wilted Violet
White ink
a scrap of black card

I hope this has inspired you to have a go and join in the challenge! 
Thanks for looking!

Tuesday, 12 September 2023

Bee-lieve Textured tag


Hi There! I am here to share a step by step for this textured tag.

I began by using the tag dies to cut a mixed media card tag and a kraft backing piece for it.

I used one of the latest dinkables to apply crackle paste to the tag and left to dry. 
Next I sprayed the tag with distress oxide sprays in carved pumpkin and peacock feathers. I also dripped a little peacock feathers onto the textured surface and splattered with water and left to dry.
Using walnut stain Distress oxide I stamped the border down the two edges.

On a separate piece of card I stamped the Bees in Black Versafine Clair ink.
I cut them out and coloured the bees with coloured pencils. 
I also stamped and cut out the Bee-lieve sentiment.
Using matte medium I assembled it all.
Here is the finished tag again.
I used:
Distress oxide sprays in Peacock Feathers and Carved Pumpkin
coloured pencils

Don't forget we have a monthly challenge over in the Bee Crafty Stamps facebook group.
You can also book a place on my Bee Crafty Workshop over on the website. The Live Workshop will be available from 30th September indefinitely, so if you can't make it on the day you will be able to watch it as many times as you like after the event.  
Thanks for looking! 

Tuesday, 5 September 2023

Lilies journal page


Hi There! I have just finished the last page in my journal, so I thought I would show you what I did with it.

I began by masking off the page to the left and spraying it with a selection of distress oxide sprays, once it was dry I removed the masking tape and sheet of paper
I fastened the Big one inkable to the page using bulldog clips and added distress crackle paste through the inkable. The inkable will need to be cleaned before the crackle paste dries. 
once it was dry, I added some drops of brushed corduroy distress oxide spray and tarnished brass distress stain to the crackle paste, then left it to dry again. 
I used the script background stamp without a skinny slim to add some vintage photo distress oxide ink around the lilies. 
Next I used the same ink through a tag inkable from set 1 with a blending brush. 
On a snippet of kraft card I stamped the sentiment from mixed messages 2, then cut it out. 
I added this to the page using matte medium and added a few splatters of white Dina Wakely gloss spray.
I used
Distress oxide sprays in peacock feathers, salvaged patina, twisted citron, speckled egg and Brushed corduroy. 
Vintage photo distress oxide ink
scrap of kraft card

I will be having a go at decorating the cover tomorrow evening over on the Bee crafty Facebook page. 
On 30th September I will be teaching an online workshop using Bee Crafty products. This is in a private facebook group and can be viewed after the event as many times as you need it. Here's a little teaser
Follow this link to the website for more details
Thanks for looking! 

Tuesday, 29 August 2023

Can you hear buzzing?


Hi there! I made these cute earrings at the weekend using Bee Crafty stamps and shrink plastic. Here's how I made them

I began by stamping the largest bee twice onto clear sanded shrink plastic. 
Next I used a hole punch to add holes between the antennae.  
I cut around the bees leaving a small border, and the holes at the top to attach them to the earrings. 
Once the ink was definitely dry I coloured them using coloured pencils.
 
Using tweezers and a Heat tool I shrunk the bees. You can watch the video of them shrinking here
I added jump rings through the holes and threaded 3 beads onto each of the eye pins.
using round nosed pliers and wire cutters I created a loop at the top of the eye pin and fastened the ear hooks and bees to either end.
Here are the earrings again

I used: 
Bee Mine stamp set
Brilliance ink
Clear shrink plastic, sanded on one side so it can be inked and coloured
Coloured pencils
2 eye pins
2 ear hooks
2 jump rings
6 beads
round nosed pliers and wire cutters

Thanks for looking!