Showing posts with label stamping on fabric. Show all posts

Monday, 23 August 2021

Bee Monarchy wall hanging


Hi there! Thought you might like to see a step by step for my embroidered Bee fabric wall hanging. 

I began by stamping the Bee in versafine clair onto a piece of calico. A stamp press is a good idea as the magnets help to keep the fabric still. 

I removed it from the stamp press, put it into a small embroidery hoop and began to embroider it. I used 2 strands of embroidery thread for all of the bee's body and legs, completing the white and yellow stripes first before beginning the black. With the white tail I added a few strands of grey for shading. I just used varying lengths of satin stitch. It doesn't need to be particularly neat as it gives the impression of the bee's fluffy coat.
I then embroidered the legs in the same way.
For the eyes I used a sparkly black thread and stitched french knots. This thread was quite a bit thicker -the eqivalent to about 4 strands of regular 6 strand embroidery thread.
For the wings I found some sheer organza style ribbon (if you can find one that doesn't fray that is great!). I cut a piece that was big enough to cover the wings and dipped it in some watered down blue acrylic paint. 

When it was dry (air dry as some of these ribbons melt very easily), I traced the shape of the wing through it using a pencil, cut it to size, then stitched it in place using a single strand of fine silver thread.
Once the embroidery was finished I took it out of the embroidery hoop, cut a circle of white felt and blanket stitched in yellow around the edge. 

I sprayed a 6x6" square of calico with a light spray of lemon gloss spray. When this was dry I placed the honeycomb inkable over it then sprayed lightly with cheddar gloss spray. I stitched this to a piece of hessian using back stitch before attaching the bee panel to the middle with 5 or 6 small stitches around the edge.
I added a paper flower using a brad bottom left and frayed the edges a little.

I used the plain hanger and painted it with white gesso. I added a piece of the mdf pop-out honeycomb that I had trimmed to fit and painted with gold paint. In each section of the honeycomb I added some glossy accents swirled with a shake of Pretty Gets Gritty Apollo explosion powders.
I used some white fabric tape to attach the hanger to the panel.
And here it is finished. 
Here are links to the products I used
Calico
Embroidery threads
Hessian
organza style ribbon or fabric in white or pale blue
MDF hanger  - will hopefully be available soon
paper flower and brad

I am really enjoying combining my stamping and sewing and will definitely be having a go at more in the not too distant future. 
Thanks for looking and Happy Crafting!

Monday, 2 August 2021

Journaling girl Makeover


Hi There! Last time Bev and Sam were on the Craft Store, Adam was talking about creating fabric dresses for the journaling girls, so I decided to have a go. 

I began by stamping Sam on to a piece of calico with Archival ink.

Next I used a combination of Inktense blocks and Dina Wakely scribble sticks to colour her skin and hair.

I found some lovely variegated embroidery thread in yellow and brown that was perfect for hair and used long stitch. I also added a row of pale pink seed beads at the base of her bun. 
Next I took a square of  fabric (This was a dyed silk handkerchief) and placed it over the top half of the stamped image. I lined it up with the sleeves then stitched across the shoulders and neck with a small running stitch. 

Once this was secured in place I pulled the top edge of the fabric down and added some more small stitches around the edge of the bodice to secure the fabric, tuck in the raw edges and add some shape.


I took a rectangle of fabric approximately16x12cm . I attatched the centre point to the waistline using a small running stitch. 
I then pulled the top of the fabric down and added a row of the seed beads to the waistline. I arranged the skirt and added a few more seed beads to keep it in place. I also added a sequin and a seed bead to the bodice.
I used one of the small stamps from the Sam set to add a background using archival inks.
Next I added some interfacing behind the project to make it more sturdy - It doesn't need to be the iron-on variety, just a piece of fabric, felt, thin wadding or batting. This was secured in place by adding a border of lace around the edges. I used my sewing machine for this but it could have easily been hand stitched. I also added a strip of ribbon down each side, which I secured using sequins and seed beads.
I sprayed an mdf butterfly hanger (This is a sneaky peek!) with Dina Wakely gloss sprays in Fuchsia and White and added a couple of loops of ribbon.
I gave her some earrings to match...
then finally I attached the panel to the hanger with a couple of stitches at each side. 
Here are links to the products used:

I also used scraps of ribbon and lace, Embroidery thread, seed beads, Sequins, a softly draping fabric for the dress (you could pick something up in a charity shop to cut up), Calico and interfacing/wadding/ batting.
The important thing with a little project like this is it doesn't need to be super neat. The edges can be left raw and the stitches don't need to be tiny neat ones. Some people call it slow stitching, and it is as much about the mindfulness of using a needle and thread as the finished product. A bit of ironing of the calico at the beginning and end will help it to look good. it also doesn't need to be expensive. You could make something like this from clothing that is past it's best or charity shop bargains.
I hope you like my project today. Thank you so much for all of the congratulations messages on grading to 1st Dan. I am eagerly awaiting delivery of my belt embroidered with my name in Japanese in gold!
Thanks for looking! 

Monday, 14 September 2020

Stamping on fabric for Bee Crafty


Good morning! I am here with a little Bee Crafty DT project and to bust a few myths, lol! Let's start with those. Firstly you don't need special ink to stamp on fabric unless you are going to wash it. If it is going on a card it isn't going to be washed, so most inks will work well. I have used versafine, versafine clair, memento luxe, stazon, brilliance and versamagic. All worked fine, but I was particularly impressed with the versafine clair, which is not waterbased and can be coloured and dampened after stamping without it changing.

Secondly, you can colour your fabric with most mediums. All those sprays like dylusions and distress oxides can be sprayed on fabric. It would wash out, but for a card they are wonderful. You can also colour with inktense pencils and blocks which I am told can be heat set, becoming permenant after ironing. You will need to iron your fabric a couple of times during the process. You can also use a range of fabric. The best thing to do is experiment and see!

Let's get on shall we?

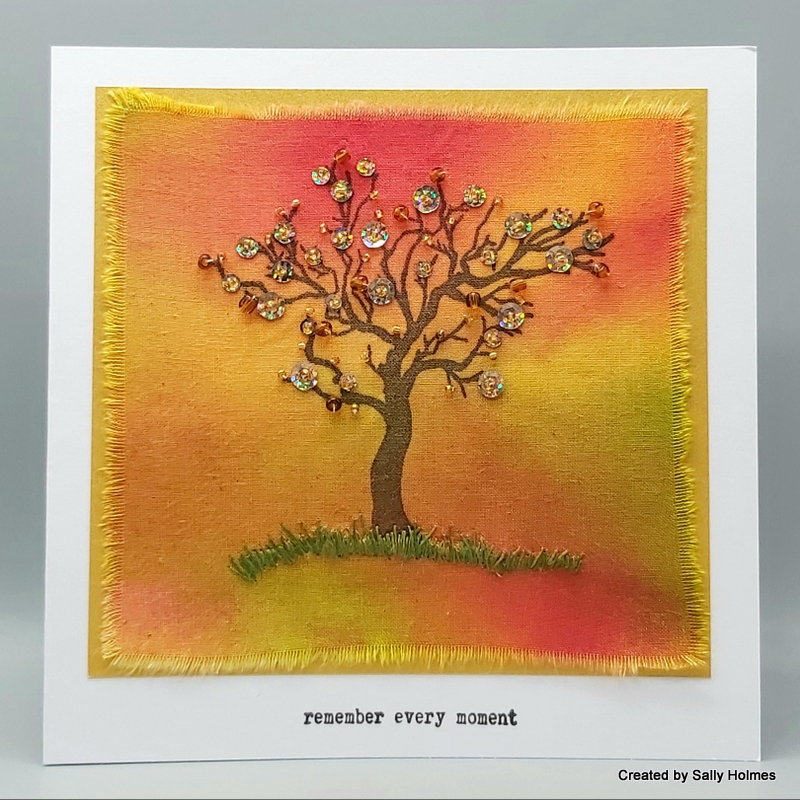
I used dylusions spray inks, Beautanicals large branch and tree stamps, Wordage small words, Brown Versafine clair ink, sequins, seed beads and green embroidery threads


First I started with a piece of calico and sprayed with dylusions and water. Once it was almost dry I ironed it. I've also used poly cotton pillow cases and curtain lining which also worked well. I tend to rip the fabric to give a frayed edge along the weave so it is straight.

I placed the flat coloured fabric in my stamp platform and stamped the tree using versafine Clair. If you want to use an embroidery hoop make sure your fabric is big enough and you stamp centrally. You can always make it smaller afterwards.

Next you can use up some of the little stuff from your stash! I sewed on small seed beads in the middle of sequins. Check your needle is narrow enough to pass through your beads before you thread it, lol.

Next I added some smaller and larger seed beads on their own.


To ground my tree I added 'grass' which is just straight stitch in 2 different shades of green. It doesn't have to be neat and it can be all different lengths, just like grass. Just keep going until the gaps are filled. I used single strands of embroidery thread for my grass. You could add some embroidery to the tree too. Single Chain stitch makes good leaves and french knots also look good. There are plenty of you tube videos for these. Once you have finished, iron your fabric again taking care around the embellishments.


Mat and layer your fabric to your card. Double sided tape works well, or use a good glue stick to stick fabric to paper. You could even sew it together! 

Finally add a sentiment...

I am really enjoying getting back into needlework at the moment. I've realised there are lots of stamps I can use for this sort of project and it is good to experiment, mixing paper, card and fabric, as well as inks and sprays!

Before I go, just out of curiosity, would you be interested in doing something like this as an online workshop? A little kit to sit and stitch together? It would have to be via facebook I think, or possibly zoom. If so leave me a comment as it is something I am thinking about 😀

Thanks for looking!